Plant-by-Plant Care
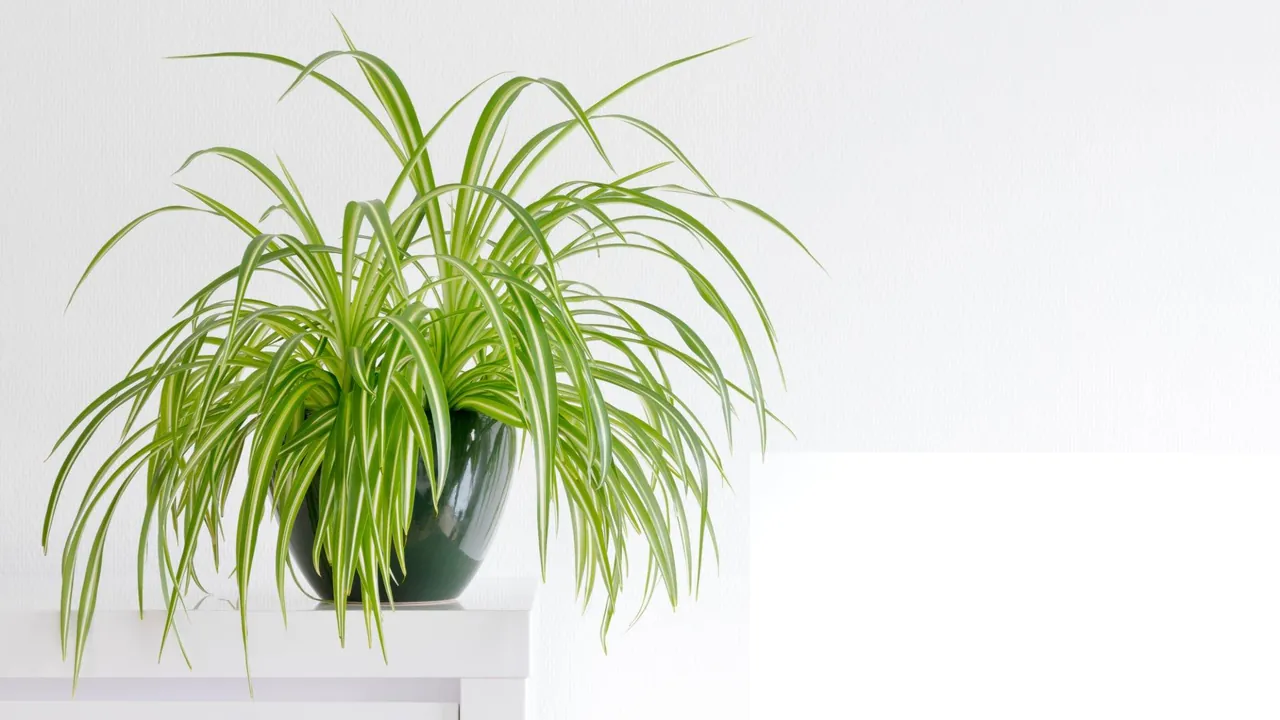
How to Care for a Spider Plant
Learn how to care for a spider plant indoors: light, watering, fixing brown leaf tips, propagating the babies, and why it's safe for cats and dogs.
Disclosure: The Plant Pages is reader-supported. Some pages include ads and affiliate links, and we may earn a commission from qualifying purchases, at no extra cost to you.
If you want a houseplant that survives a bit of neglect, brightens a shelf with arching striped leaves, and is genuinely safe around pets, the spider plant is hard to beat. Quick answer: to care for a spider plant indoors, give it bright indirect light (it tolerates lower light too), water when the top inch of soil dries out, and keep it in average household humidity. The most common gripe is brown leaf tips, usually from fluoride and chlorine in tap water or soil drying too far, so filtered or rainwater and steady watering go a long way. Below I’ll walk through exactly how to care for a spider plant, including propagating those charming babies.
Spider plant care at a glance
Here’s the whole routine in one table. The sections below explain the why.
| Need | What the spider plant wants |
|---|---|
| Light | Bright, indirect light; tolerates medium to low |
| Water | When the top inch of soil is dry |
| Soil | Standard well-draining houseplant potting mix |
| Humidity | Average household humidity is fine |
| Temperature | 60 to 75°F (16 to 24°C), no cold drafts |
| Feeding | Diluted houseplant fertilizer, spring and summer |
| Pot | Drainage holes; snug rather than huge |
| Repotting | When rootbound, usually every 1 to 2 years |
| Pet safety | Non-toxic to cats and dogs |
Why the spider plant is so forgiving
The spider plant (Chlorophytum comosum) earned its beginner-favorite reputation for good reason. It puts up with inconsistent watering, a wide range of light, ordinary indoor air, and the occasional forgotten week far better than most houseplants. Its thick, fleshy roots store water, which is part of why it shrugs off a missed drink and recovers quickly.
That toughness does not mean it has no preferences, just that it tells you clearly when something is off and rarely punishes a single mistake. Get the light and watering roughly right and it will reward you with long, arching leaves and, in time, a parade of baby plants on slender stems.
Spider plant varieties: does care change?
Everything in this guide applies to every common spider plant variety; there is no separate routine to learn. The named types differ in looks, not needs:
- Vittatum: the classic form, green leaves with a white center stripe.
- Variegatum: the reverse pattern, green centers with white edges.
- Bonnie: curly leaves that corkscrew instead of arching, a good fit for tight spaces.
- Hawaiian: new leaves emerge with a champagne-gold stripe that softens to green as they mature.
The one nuance worth knowing: white leaf tissue does not photosynthesize, so heavily variegated plants have less working leaf area. Give Vittatum, Variegatum, and Hawaiian types a slightly brighter spot than you would a solid green plant, and the markings stay crisp while growth keeps pace.
Light: bright and indirect, but flexible
Spider plants look their best in bright, indirect light, which brings out the crispest variegation, the boldest stripes, and the steadiest production of dangling babies. A spot near an east-facing window, or a few feet back from a brighter south- or west-facing one, is close to ideal.
Here is where their flexibility shines: they also tolerate medium and even fairly low light, keeping going in a north-facing room or an interior space. The trade-off is slower growth, leaves that lose some striped contrast and drift toward plain green, and fewer runners. So if your spider plant has stopped making babies, dimmer light is a likely reason, and nudging it brighter often wakes it back up.
What they don’t appreciate is harsh, direct midday sun, which can bleach or scorch the leaves, especially the pale variegated parts. If your only bright window gets blasting afternoon sun, a sheer curtain softens it. Rotate the pot a quarter turn each week so the rosette grows evenly rather than leaning toward the glass.
If a bright window isn’t available, a spider plant is one of the better candidates for a dimmer corner, which is why it shows up on most lists of the best indoor plants for low light. Just set expectations: it will survive and stay attractive, but it won’t grow as vigorously or pump out as many plantlets as it would in good light.
Watering: when the top inch dries out
Watering is where most spider plant problems start, and the fix is simple once you stop watering on a fixed calendar. The rule of thumb: water when the top inch of soil feels dry, then water thoroughly until it runs from the drainage holes, and empty the saucer so the pot never sits in water.
Indoors this often works out to roughly once a week in the warm months and less in winter, but light, pot size, and season all shift the timing. Push a finger into the soil first; the soil, not the day of the week, makes the call.
Those water-storing roots give the spider plant a real buffer, so it forgives a missed watering far more easily than soggy roots. As with most houseplants, chronic overwatering is the bigger danger. If the soil stays wet for many days, the roots can rot, showing up as a mushy base, yellowing, and a sour smell. Soil that stays damp at the surface also invites tiny black flies, and if you spot them, our guide on how to get rid of fungus gnats on houseplants covers the fix. When unsure, let it dry a touch more.
One note on the water itself, because it matters more here than for most plants: spider plants are unusually sensitive to the fluoride and chlorine in much tap water, the leading cause of the brown leaf tips so many owners notice. More on that next.
Brown leaf tips: the classic complaint, and how to fix it
If you only ever search one thing about this plant, it’s probably “why does my spider plant have brown tips.” It’s the most common issue, and the good news is that it’s cosmetic, not life-threatening: your plant is healthy, and the tips just show stress first.
There are a few causes worth telling apart:
- Fluoride and chlorine in tap water. This is the big one for spider plants. They’re sensitive to fluoride, which accumulates in the leaf tissue and burns the tips brown, and chlorine can contribute too. Letting tap water sit out overnight drives off chlorine, but fluoride does not evaporate, so use filtered, distilled, or rainwater. Switching water sources often clears up new brown tips over the next few months of fresh growth.
- Soil drying out too far. Letting the pot go bone-dry, or swinging between soaked and parched, also browns the edges. Steadier watering, triggered by the top-inch test, smooths this out.
- Fertilizer salt buildup. Over-feeding leaves a crust of mineral salts that scorch the tips. Feed lightly (more below) and flush the pot with plain water occasionally.
- Very dry air. Low humidity, especially in winter with the heat running, can add to tip browning, though it’s a smaller factor than water quality.
Existing brown tips won’t turn green again, since damaged tissue doesn’t heal. Snip the brown bit off with clean scissors, following the leaf’s natural taper for a tidy cut, then focus on preventing new ones. Address the cause, and the fresh leaves that follow should come in clean.
Humidity and temperature
Spider plants are easygoing about humidity and do fine in ordinary household air, so you don’t need a humidifier in most homes. If your air gets very dry in winter and you’re seeing tip browning, a pebble tray or nearby humidifier can help a little, but water quality is usually the more productive fix first.
They’re comfortable in the range most of us keep our homes, roughly 60 to 75°F (16 to 24°C). They’re not frost-hardy, so keep them away from cold window panes in winter and out of the path of heating and cooling vents, where dry, fluctuating air can stress the leaves. A spider plant can spend summer outdoors in shade or dappled light, but bring it back in well before the first cold nights.
Soil and pots
Spider plants are not picky about soil. A standard, well-draining houseplant potting mix is all they need; water should drain freely rather than pool, so the roots get air between waterings. If your mix feels heavy or holds water a long time, working in a couple of handfuls of perlite loosens it.
Choose a pot with drainage holes. A decorative cachepot with no holes is fine only if the plant lives in a nursery pot inside it that you can lift out to drain. Those vigorous roots can crack a thin plastic pot or push the whole plant upward when crowded, so plan to size up every so often.
Fertilizing: light and seasonal
Spider plants aren’t heavy feeders. During the active growing season in spring and summer, a balanced liquid houseplant fertilizer diluted to about half the label strength, roughly once a month, is plenty. Ease off in fall and stop in winter, when growth slows and the extra nutrients aren’t needed.
Restraint pays off. The salts left behind by too much fertilizer are one of the brown-tip causes mentioned earlier, so a gentle hand keeps the foliage cleaner. If you see a white crust on the soil, flush the pot with plain water to rinse the excess through. And feed right after a normal watering rather than onto bone-dry soil, so the diluted solution spreads evenly instead of concentrating against dry roots.
The babies: propagating spiderettes
Half the fun of a spider plant is the plantlets, the ready-made baby plants that dangle from long, wiry stems called runners. Often nicknamed spiderettes, they’re one of the easiest things in the houseplant world to propagate. A mature, healthy plant in decent light sends these out on its own, sometimes after producing tiny white star-shaped flowers along the runner first.
You have two reliable approaches:
- Root it in soil while still attached. Set a small pot of moist potting mix next to the parent, nestle the base of a plantlet (the part with the little root nub starting) onto the surface, and pin it down with a bent paper clip so it stays in contact. Keep the soil lightly moist. Once the plantlet has anchored with its own roots, usually a couple of weeks, snip the runner connecting it to the parent. Because it stayed fed by the parent throughout, this method has a very high success rate.
- Root it in water after cutting. Snip a plantlet off the runner, set the base in a glass of water (leaves above the waterline), and place it somewhere bright but out of direct sun. Roots typically appear within a week or two. Once they’re an inch or two long, pot it up in moist soil. Don’t leave it in water indefinitely; water-grown roots transition best when moved to soil young.
A few tips improve your odds: pick plantlets that already show small root nubs, keep new transplants out of harsh sun while they establish, and don’t let a freshly potted baby dry out completely in its first few weeks. Propagating spider plants is a great confidence builder, and the babies make easy gifts.
Repotting: when and how
Spider plants grow fast and become rootbound more often than many houseplants, so repotting is part of the routine. The clearest sign is those thick, fleshy white roots crowding the surface, coiling around the inside of the pot, or pushing the whole plant up out of the soil. Water running straight through, and soil that dries within a day or two, point the same way.
Here’s a useful quirk: spider plants tend to flower and produce more of those coveted babies when slightly rootbound. So there’s no need to rush a snug plant into a bigger pot. Repot when it’s genuinely crowded, not at the first sign of a root.
When it is time, repot in spring and move up just one pot size, an inch or two wider, with drainage holes. Ease the plant out, gently loosen any tightly circling roots, and trim away anything dark, mushy, or foul-smelling. To make more plants, this is also the moment to divide a large clump: pull or cut the root mass into sections, each with its own leaves and roots, and pot them separately. Set the plant at the same depth it grew before, water once to settle the soil, and hold off on fertilizer for about a month while new roots establish.
Is the spider plant safe for pets?
Yes, and this is one of the spider plant’s strongest selling points for households with animals. Chlorophytum comosum is listed as non-toxic to both cats and dogs by the ASPCA, so an accidental nibble is not the emergency it would be with many popular houseplants. That makes it a reliable pick when you want greenery you don’t have to keep on a high shelf, and it features on most roundups of non-toxic indoor plants for dogs and cat-friendly homes.
Two honest caveats. First, “non-toxic” doesn’t mean an animal should make a meal of it; chewing a lot of any plant can still upset a pet’s stomach, so it’s worth discouraging. Second, cats are often drawn to the dangling leaves and may bat at or chew the trailing babies, so a hanging planter usually keeps the foliage out of reach and spares both. If you want a pet-safe plant with a different look, the peace lily is worth knowing about too, though it is the opposite case: peace lilies are toxic to pets, so the spider plant remains the safer of the two for a pet home.
Common problems and quick fixes
Most spider plant troubles trace back to water quality, watering rhythm, or light, and the symptom usually tells you which.
Brown leaf tips. Covered in full above. The leading cause is fluoride and chlorine in tap water, followed by soil drying out too far and salt buildup from over-feeding. Switch to filtered, distilled, or rainwater, water more evenly, and feed lightly. Existing brown tips can be trimmed; new growth should come in clean once the cause is fixed.
Pale, fading stripes. When the bold variegation washes out toward plain green, the plant usually wants more light. Move it somewhere brighter (still indirect) and the contrast typically returns in new leaves.
No babies. A spider plant that won’t make plantlets is often too young, in light that’s too dim, or occasionally over-potted. Maturity, brighter indirect light, and a slightly snug pot all encourage runners. Patience helps too; young plants simply aren’t ready yet.
Yellowing leaves. Occasional yellowing of an old lower leaf is normal aging. Widespread yellowing, especially with soggy soil and a soft base, points to overwatering and possible root rot, so let the soil dry further and check that the pot drains.
Limp, drooping leaves. This usually means the plant got too dry, and a thorough watering often perks it back up within a day. If the soil is wet instead and the plant still droops, suspect overwatering and root trouble.
For a reliable reference on this species, the Missouri Botanical Garden’s plant finder entry for Chlorophytum comosum is a good place to dig deeper.
Signs you’re getting it right
You’ll know your routine is working when you see firm, arching leaves with clean tips and crisp striping, a steady push of new leaves from the center of the rosette, and, in good light, long runners reaching out with baby plants at their ends. The soil should dry within roughly a week of watering rather than staying soggy, which tells you the drainage and watering rhythm are balanced.
The bottom line: give your spider plant bright indirect light (or accept slower growth in a dimmer spot), water when the top inch dries, use filtered or rainwater to keep the tips clean, feed lightly in the warm months, and repot only when truly crowded. It’s one of the most forgiving and rewarding houseplants you can grow, and the endless supply of free babies is a lovely bonus.