Troubleshooting
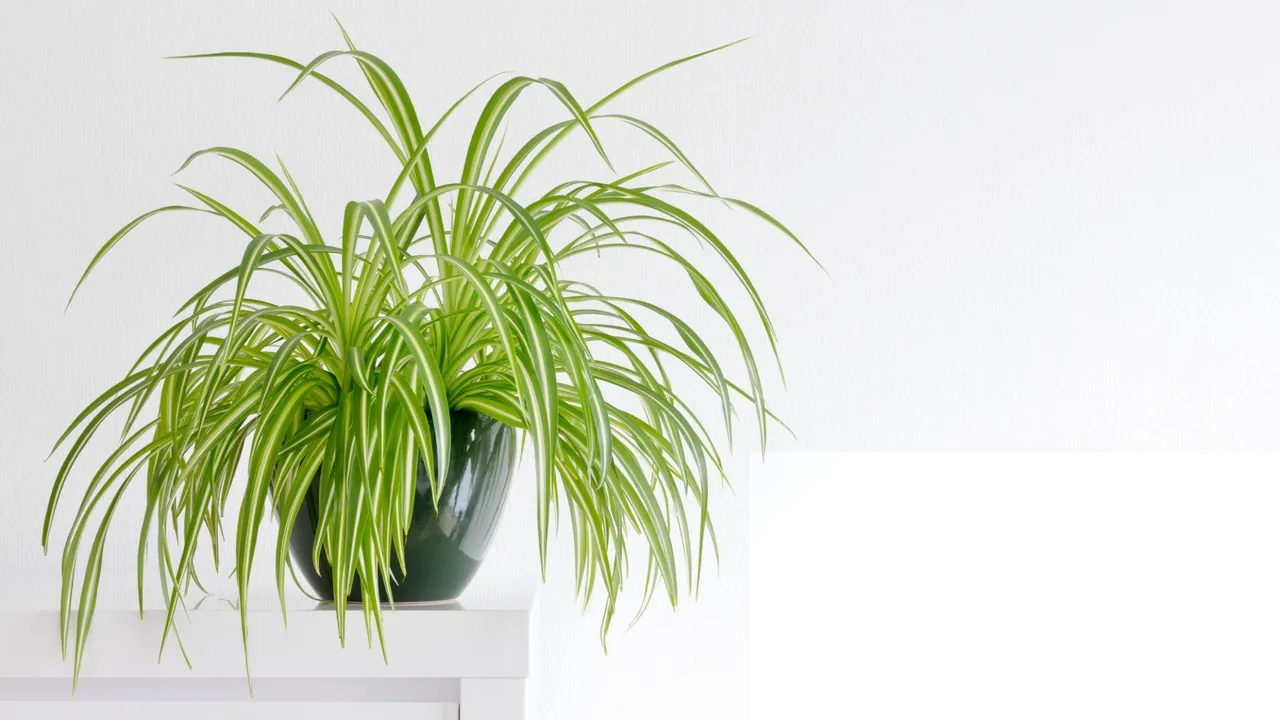
Why Is My Spider Plant Getting Brown Tips?
Wondering why is my spider plant getting brown tips? It's almost always fluoride and salts in tap water. Learn the causes, the easy fixes, and how to trim.
Disclosure: The Plant Pages is reader-supported. Some pages include ads and affiliate links, and we may earn a commission from qualifying purchases, at no extra cost to you.
If your otherwise thriving spider plant keeps developing crispy brown points on the ends of its leaves, take a breath: this is the single most common spider plant complaint, and it is rarely serious. Quick answer: the usual reason why your spider plant is getting brown tips is fluoride, chlorine, and salts in your tap water, which this plant is unusually sensitive to and which build up at the leaf tips over time. Inconsistent watering, dry indoor air, and fertilizer buildup can add to it. Switch to filtered, distilled, or rainwater, keep watering steady, flush the soil now and then, and the browning stops. The plant stays healthy throughout. Here is exactly how to diagnose and fix it.
The short version: tap water is usually the culprit
Spider plants (Chlorophytum comosum) are tough, forgiving, and famously hard to kill, which is part of why brown tips frustrate people so much. The plant looks healthy in every other way, yet those dry brown points keep appearing. The reason is almost always something in the water rather than anything you are doing wrong with light or care.
Spider plants are what growers call sensitive to fluoride. Tap water in many municipalities is fluoridated, and it also carries chlorine or chloramine for disinfection plus dissolved mineral salts. The plant draws water up through its leaves and lets some of it evaporate at the tips. The water leaves, but the minerals and salts do not. They concentrate at the very ends of those long arching leaves, and over weeks that accumulation scorches the tip tissue brown.
This is a real, well-documented sensitivity. Spider plants, dracaenas, and a handful of other houseplants show fluoride damage as tip burn far more readily than most foliage plants do. So if you have ruled out the dramatic problems and your plant is otherwise green and growing, water quality is the first thing to suspect.
How to tell tap-water browning apart from other causes
Before you change anything, it helps to read the pattern of the browning, because the look of it points to the cause.
- Dry, crispy brown tips on many leaves, with the rest of the leaf green and firm. This is the classic fluoride and salt signature. It tends to show up gradually across the whole plant, worst on older leaves that have been collecting minerals longest.
- Brown tips plus a thin yellow halo where brown meets green. This often means salt or fertilizer buildup specifically. The yellow band is the transition zone of stressed tissue.
- Brown, papery tips combined with limp, drooping leaves and bone-dry soil. That points to underwatering or letting the soil dry out too far between drinks, not water quality.
- Brown tips alongside widespread yellowing, soft leaf bases, or a sour smell from the pot. That is a different problem entirely, usually overwatering and root rot, and it needs a different fix (let the soil dry, check the roots, improve drainage).
Most of the time you will land on the first or second pattern, which both trace back to what is in the water and the soil. The good news is that the fixes overlap.
Cause 1: fluoride, chlorine, and salts in tap water
This is the leading cause, so it deserves the most attention. Three things in ordinary tap water can scorch spider plant tips, and they behave differently:
- Fluoride is added to many public water supplies. It does not evaporate or gas off, so letting water sit out will not remove it. Of the three, fluoride is the one most specifically tied to spider plant tip burn.
- Chlorine and chloramine are added as disinfectants. Plain chlorine does dissipate if you leave water out overnight in an open container. Chloramine is more stable and does not leave as readily, which is worth knowing if your utility uses it.
- Dissolved salts and minerals, including the calcium and magnesium that make water hard, build up in the soil and the leaf tips over time.
The fix: water with filtered, distilled, or rainwater whenever you reasonably can. Distilled and reverse-osmosis water remove fluoride and salts most completely. Collected rainwater is naturally low in these minerals. A basic carbon filter pitcher reduces chlorine and some contaminants, though it does not remove fluoride well, so distilled or rainwater is the stronger choice if fluoride is your issue. If your only option is tap water, letting it sit out overnight at least releases free chlorine, but understand that this trick does nothing for fluoride or salts. That limitation is exactly why the sit-it-out advice so often fails to fix spider plant tips: it targets the one ingredient that may not be the main offender.
You do not have to be perfect about this. Even switching most of your waterings to filtered or distilled water noticeably slows new browning.
Cause 2: inconsistent watering and soil drying out too far
Spider plants store water in thick, tuberous roots, which is why they survive neglect. But big swings between soaked and bone-dry stress the leaf tips. When the soil dries out completely and then gets flooded, the plant cannot move water steadily to the leaf edges, and the tips dry and brown.
Spider plants like their soil to stay lightly, evenly moist during the growing season, not soggy and not desert-dry. Aim to water when the top inch or so of soil feels dry to the touch, before the whole pot dries out. In practice that often means roughly once a week indoors, but treat that as a starting point and check the soil rather than watering on a rigid schedule, since light, pot size, and season all shift the timing.
A few habits that keep watering consistent:
- Check the top inch with your finger every few days so you catch the soil before it goes fully dry.
- When you do water, water thoroughly until it runs from the drainage holes, then empty the saucer so the roots are not left standing in water.
- In winter, when growth slows, the plant needs less, so ease off rather than watering on autopilot.
For a fuller routine on getting watering and the rest of the basics right, see our complete guide on how to care for a spider plant.
Cause 3: low humidity and dry indoor air
Spider plants tolerate average household humidity well, so dry air is usually a contributing factor rather than the whole story. Still, very dry indoor air pulls moisture from the leaf tips faster than the plant can replace it, which nudges tips toward browning, especially in winter when heating systems dry the air and when a plant sits near a heat vent or radiator.
If your home runs dry, a few things genuinely help. Grouping plants together raises the local humidity around them a little. A pebble tray (a shallow dish of water with pebbles, the pot resting on top so it sits above the waterline) adds some moisture as the water evaporates. A small room humidifier does the most real good if the air is truly arid.
One thing worth saying plainly, because it comes up constantly: misting is mostly a feel-good ritual. The moisture evaporates within minutes and does little for sustained humidity, and leaves left damp can be more prone to fungal spotting. If you enjoy misting, it does no harm, but do not count on it to cure brown tips.
Cause 4: fertilizer salt buildup from overfeeding
Spider plants are light feeders, and overfertilizing is a surprisingly common cause of brown tips. Excess fertilizer is just more salt added to the soil, and those salts concentrate at the leaf tips exactly the way tap-water minerals do, burning them. A telltale sign is a whitish or yellowish crust on the soil surface or around the pot rim, which is accumulated salt.
The fix: feed sparingly. During spring and summer, a balanced liquid houseplant fertilizer diluted to about half the label strength, roughly once a month, is plenty. Stop feeding in fall and winter when growth naturally slows. If you suspect buildup, hold off on fertilizer entirely for a while and flush the soil (the next section explains how). Less feeding is almost always better than more with this plant.
It is worth noting that spider plants are vigorous and will grow well on very little fertilizer, so if you are unsure whether to feed, leaning toward less is the safer judgment call.
How to flush salts out of the soil
Because both tap-water minerals and fertilizer salts accumulate in the potting mix, periodically flushing the soil clears them out and is one of the most useful things you can do for a brown-tipped spider plant.
To flush:
- Take the plant to a sink or tub.
- Run room-temperature water slowly through the soil surface, letting it drain freely from the bottom, for a few minutes. You want several times the pot’s volume of water to pass through and carry dissolved salts away.
- Let the pot drain completely before returning it to its spot, so the roots are not left sitting in water.
Doing this every couple of months, especially if you use tap water or fertilize, keeps salt levels down. If you have heavy white crust on the soil, flushing will help dissolve and rinse it through. In stubborn cases, replacing the top inch of crusted soil with fresh mix, or repotting into fresh soil, resets things.
How to trim brown tips the right way
Here is the part people most want to know, so let me be clear up front: trimming is purely cosmetic. Cutting the brown tips off does not heal the plant or stop new browning; only fixing the cause does that. But trimming does make the plant look tidy again, and there is no harm in it.
Two things to understand before you cut. First, browned tissue is dead and will never turn green again, so trimming is the only way to remove it. Second, if you cut into the living green part of the leaf, that fresh cut edge will itself brown, because you have created a new wound for the plant to wall off. So the trick is to cut along the dead zone, not into healthy tissue.
To trim cleanly:
- Use clean, sharp scissors or snips.
- Follow the natural shape of the leaf. Spider plant leaves taper to a point, so cut at an angle that mimics that point rather than snipping straight across, which looks blunt and unnatural.
- Leave a very thin sliver of the brown edge rather than cutting right back to green. This keeps you from wounding living tissue and triggering a fresh brown line.
Trim only as much as you like for appearance. Many growers simply leave minor tip browning alone, since the plant is unbothered by it.
Will the brown tips come back, and does it matter?
If you fix the underlying cause, existing brown tips will not spread, and new leaves will come in clean. The leaves you already trimmed or that already have brown tips will keep those tips (the dead tissue cannot regreen), but fresh growth tells you whether your changes are working: watch the newest leaves, and if they emerge and stay green to the tip, you have solved it.
It is genuinely fine if a little tip browning persists. A spider plant with some brown tips is still a healthy spider plant. It will keep growing vigorously, arch out its long striped leaves, and send out the dangling plantlets (the baby spiderettes) that make it so fun to grow and share. Brown tips are a cosmetic quirk of a sensitive plant, not a sign of decline. The only time browning signals real trouble is when it comes alongside the overwatering symptoms mentioned earlier, like widespread yellowing or mushy, foul-smelling roots, which is a separate issue.
A quick recovery checklist
If you want a simple plan to follow, here it is in order of impact:
- Switch your water. Move to filtered, distilled, or rainwater. This addresses the most common cause directly.
- Water consistently. Keep the soil lightly, evenly moist; water when the top inch is dry; do not let it swing between soaked and bone-dry.
- Flush the soil every couple of months to clear accumulated fluoride and fertilizer salts.
- Ease off fertilizer. Feed lightly in spring and summer only, at half strength, and not at all in winter.
- Raise humidity if your air is dry, using grouping, a pebble tray, or a humidifier rather than misting.
- Trim the tips at an angle following the leaf shape, purely for looks, leaving a sliver of brown so you do not wound green tissue.
Give those a few weeks and judge by the newest leaves. Spider plants are resilient, and most people see new growth come in clean once the water and salt issues are handled.
If you are dialing in watering across several easygoing houseplants and want another low-fuss reference, our guide on how often to water an aloe vera plant walks through a similarly forgiving plant where, interestingly, the watering instinct runs the opposite way.
The bottom line: brown tips on a spider plant are the most common complaint with this plant and almost never a serious one. They are usually your tap water talking. Switch to gentler water, keep watering steady, flush the salts, feed lightly, and trim for tidiness if you like. Your spider plant will keep right on thriving.